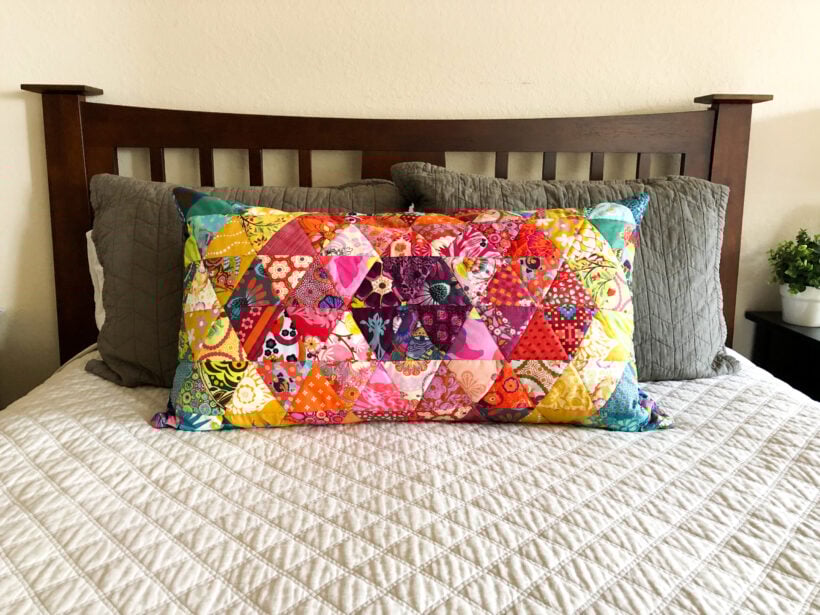
Hello Sewing friends!! I have a fun make to show you today!! I sewed up this beautiful pillow for my sister's birthday and I am in love with how it turned out. I made it using the Patchwork Prism Pattern designed by Anna Maria Horner for Janome.
I used the pillow sham variation and now that I see how beautiful it is in real life I just may make the whole quilt. Anyway as I was making it I thought I'd snap some pics and write up a little tutorial for you on how to insert an invisible zipper in a pillow. Scroll down to see all of my tips and tricks.

For a long time invisible zipper installation was very frustrating to me. I would read those directions that come on the little cardboard packaging and get so confused. Also I tried using that little special invisible zipper foot you can buy which somehow is supposed to make it easy to sew.
I didn't really have luck with those feet. Instead over the years I have figured out a few tricks that make invisible zipper installation much less painful and more successful with out much extra effort. So here we go!

This post contains affiliate links.
Invisible Zipper in a Pillow Tutorial
First off you'll need to get an Invisible zipper that is at least a couple of inches shorter on each side than the side seam of your pillow. I used a 20 inch zipper for my pillow
Step 1. Press the zipper teeth fold open
If you take a look at the RIGHT side of the invisible zipper you'll see that it is completely flat and the zipper teeth are "invisible". The zipper teeth are actually folded toward the WRONG side of the zipper. Unzip the zipper, unfold the zipper teeth, and iron the WRONG side of the zipper flat. This takes a little persistence but this step is KEY to getting a good invisible zipper insertion.
I usually have good results using a HOT iron and have never melted my zipper but I would suggest starting with a medium hot iron to start with and use just enough heat to get a good press. Do this with both halves of the zipper.
Note: Using an invisible zipper foot on your sewing machine is supposed to roll the zipper teeth out of the way as you sew. If this truly works you can skip the ironing step. But as I stated above I have never had any luck getting those feet to work properly and this little ironing hack has been a lifesaver.

Step 2. Prepare the pillow panels
For my pillow panels I chose to make mini quilt "sandwiches". I used a layer of batting in between 2 pieces of quilting cotton and added some quilting stitches for each side. For the front Patchwork Prism panel I stitched in the ditch of each triangle line. Here is what the back panel looks like all read to go.

Quick Tip: You can use a patterned fabric for the inside and follow it to make nice even quilting pattern, I used this fabric on the inside of the back panel and just sewed along the purple flowers so I didn't have to mark a grid. Sew easy! This will make a nice sturdy pillow cover for my pillow insert.
I also finished the raw edges of each panel with a serger to minimize fraying. You can use a wide zig zag stitch here as well but it isn't really necessary.

Step 3. Attach the zipper to one panel.
Pin or use binding clips to attach one zipper half to the edge of one pillow panel, in the center and with the RIGHT sides together.

Using a zipper foot, and starting with the zipper zipped up a little, sew as close to the zipper as you can and stop about an inch away from the zipper stop. Keeping the needle down, lift the presser foot and slide the zipper open so the zipper slide is on the other side of the presser foot.

Now open up the fold all the way and sew closer to the zipper. Use a stiletto or sharp scissors to hold the fold open as you sew close to the zipper teeth fold line. Do not sew on the fold line!

Sew all the way through past the end of the zipper tape. This photo also shows how close I sewed to the fold line.

Step 4. Attach the zipper to the 2nd panel
Lay the 2 panels with right sides together and match up the corners. Pin or clip the the other side of the zipper to the 2nd panel.

Start pinning with the panels together and then flip the panel over to pin it the rest of the way. Sew the zipper to the panel as in STEP 3.

One more thing to note: At the end near the zipper stop it is impossible to sew close to the teeth. Don't sweat this! It will be covered by finishing stitches. Just sew all the way to the end of each zipper tape. You can avoid this problem by using an invisible zipper that is much longer than you need but I didn't have that luxury here.

Step 5: Press the zipper folds closed
Zip up the zipper and coax the fabric together to hide the zipper. Make sure the zipper tape is laying flat and open underneath. Press over the zipper from the top using STEAM and EXTRA TIME to allow the heat to travel through all of the layers. As you can see in the right side of the photo below, there is about an inch or so at the end near the zipper stop where the fabric does not meet. This is OK because we will hide it in the next step.

Step 6: Sew around the sides of the pillow
Place the 2 pillow panels together, match them at the corners, and pin around all 4 sides.
Next, we are going to sew around the pillow with a 1/2 inch seam allowance. You will need to use a zipper foot to sew near the invisible zipper but i dont suggest using the zipper foot to sew around the sides of the pillow. I usually sew next to the invisible zipper for about 1 to 1 1/2 inches at each end first and then switch to a regular foot to sew the rest of the way around. DO NOT FORGET TO UNZIP THE INVISIBLE ZIPPER PART OF THE WAY.

You will notice the half inch seam comes about an 1/8th inch to the inside of the zipper seam. It seems counter intuitive but these 2 seams should never meet. That extra 1/8th inch is absorbed by the fold.

Step 7. Turn the pillow right side out and push out the corners.
You can trim the corners before turning the pillow right side out but it is not always necessary do so because of how padded these panels are. I left them untrimmed and they look great. Insert a pillow form and you are done! This pillow is the perfect fit for a King sized pillow. I stuffed it with this Bamboo pillow I found on Amazon.

Last TIP: Do not overstuff the pillow! The zipper will be more visible if you do.
And that is IT! Enjoy your beautiful new pillow and make another so you can practice your new skill.
Pin this for later when you want to make some new pillows and let me know if this little invisible zipper trick works for you! If you liked this tutorial check out my SEWING page for more tutorials and sewing inspiration
HAPPY SEWING!