
I made a drawstring skirt! It is so comfy and lightweight and it's helping me to survive the Florida summer heat. I have a drawstring skirt just like this one that I have loved so much, so I got out my sewing machined and used it as a pattern to make a new one.
This is one of my favorite things to do with my sewing skills...make a pattern out of something old to make something new. I would love to teach you how to do this too! I took pictures of my process and recorded some measurements so you will be able to draft your own pattern for this skirt even if you don't have one of your own. Come join me!
Sew a Drawstring Skirt!
Want to make this drawstring skirt? You can make one using measurements from a similar skirt or from you own body. Let's go!

Gather Your Supplies:
- wrapping paper with a grid printed on the back for your drafting your pattern. Found mine at Dollar Tree
- 1 yard of french terry knit. I got mine at Girl Charlee Fabrics. They have a great selection and the best prices (not sponsored)
- 2 inch wide elastic cut to the circumference of your waist minus 2 inches.
- a ball point needle for your sewing machine
- Serger (optional) you can make this solely with a regular sewing machine using a stretch stitch.
- wooly nylon thread. (optional but worth having some on hand if you sew with knit) we will use this in our regular sewing machine to finish the hem at the bottom so grab some to match your fabric.
Option 1: Draft Your Drawstring Skirt Pattern from a skirt
1. Grab the wrapping paper and lay the skirt, inside out, on the back side with the grid. Try to use the grid to help you align it evenly. Trace around the skirt but not the waistband to make the pattern for the skirt body.
My drawstring skirt has been worn so much that it is warped but the idea is to lay it flat so that you can trace the side seams for the seam allowance. I had to draw the curved edges at the bottom after I traced the side seams.
2. To get the top right, stretch out the waistband of the skirt until the gathering at the top goes away and make a mark on each side at the top where the waistband attaches. Connect the lines after you move the skirt out of the way.
In hindsight I may have stretched my waist band a little too much which is why my side seams came out curved. I had to fix them later when cutting my fabric.
3. Make sure to add 1/4 inch seam allowance to all sides. I also added 1 inch to the length of the skirt at the top because I wanted it a little longer.
4. Cut out the top and bottom of the pattern and fold it in half at the center. Finish cutting out the pattern by cutting along one of the sides. This will ensure your drawstring skirt is symmetrical.

5. Make a pattern for the bottom hem facing by tracing the bottom edge of the skirt body pattern, extending up the curve to the side seams about 3.5 inches
6. Draw a 1.5 inch perpendicular line at the top of each side.
7. Finish the pattern by drawing a line 1.5 inches above the skirt bottom. This will be the bottom hem facing that will allow you to have that cute curved side slit.
8. Measure the waistband including seam allowances and double the height. (mine measured 2 1/2" so I will cut it at 5") Measure the top of the skirt body pattern and subtract 2" to get the width (Mine was 19.5" so my width is 17.5") You will be cutting 2 of these (5" x 17.5") for the waistband.

Option 2: Draft the Drawstring Skirt Pattern from your Measurements
Measure your...
- waist (where you want your drawstring skirt to sit) mine = 35" , I like it to sit low
- hips (around the fullest part) mine =39"
- the distance from waist to hip. mine =7''
- the distance from your waist to your knee. mine = 22 '' sitting just below my knee
Calculate your...
- Waist line = (waist measurement + 4 inches, divided by 2) mine = 19.5"
- hip line = (hip measurement + 2 inches, divided by 2) mine = 20.5"
- Hip to waist distance, same as above
- skirt length = (waist to knee measurement - 2 inches) mine= 20

1. Cut a piece of wrapping paper 5-6 inches wider than half your hip measurement and fold it in half lengthwise along a grid line to identify a center line. Lay it on a table with the grid side up.
Follow the calculations above to draw the dimensions of the skirt body. Draw the waist line in the center top. Draw the hip line below it using the hip to waist measurement. Draw a bottom line using the skirt length measurement.
Use a long ruler to connect the hip and waist lines and continue to extend the line until it hits the bottom line. Draw a curve at the bottom of each corner.
2. Also (not pictured) make a pattern for the bottom hem facing by tracing the bottom edge of the skirt body pattern, extending up the curve to the side seams about 3.5 inches. Draw a 1.5 inch perpendicular line at the top of each side.
Finish the pattern by drawing a line 1.5 inches above the skirt bottom. This will be the bottom hem facing that will allow you to have that cute curved side slit.
3. For the waistband dimensions use your waist measurement divided by 2 for the width and 5 inches for the height
Cut Your Fabric
1. Using the patterns and dimensions, cut out 2 of each piece. Make sure the direction of the most "stretch" goes from side to side or around the body. Use pattern weights or table knives to hold the pattern in place as you cut. In the picture below I used a ruler and marker to draw on the fabric to straighten my side seam instead of re-drawing the pattern.

2. Since there is no waistband pattern simply draw the dimension on the fabric and then cut it out or use a rotary cutter and mat to get a nice straight line.
3. Also cut a 2'' x width of fabric (about 58") strip for the drawstring (not pictured).


Sew the Drawstring Skirt Together
Sew and Hem the Drawstring Skirt Body
1. With right sides together, sew the side seams of the skirt body. Do not sew the curves! Instead, sew off the skirt where the side begins to curve. Press the seams open.
I sewed the side seams with a serger. If you don't have a serger, set your machine to a stretch stitch. It usually looks like a lightning bolt zigzag (refer to your sewing machine manual). You can also use a zig zag stitch that is very narrow and long if you don't have a built in stretch stitch on your machine. It is helpful to use wooly nylon or another type of spun polyester thread. After sewing the seam finish the raw edge with a zig zag stitch.

2. Serge or zig zag along the top and ends of each bottom hem facing separately for stabilization.
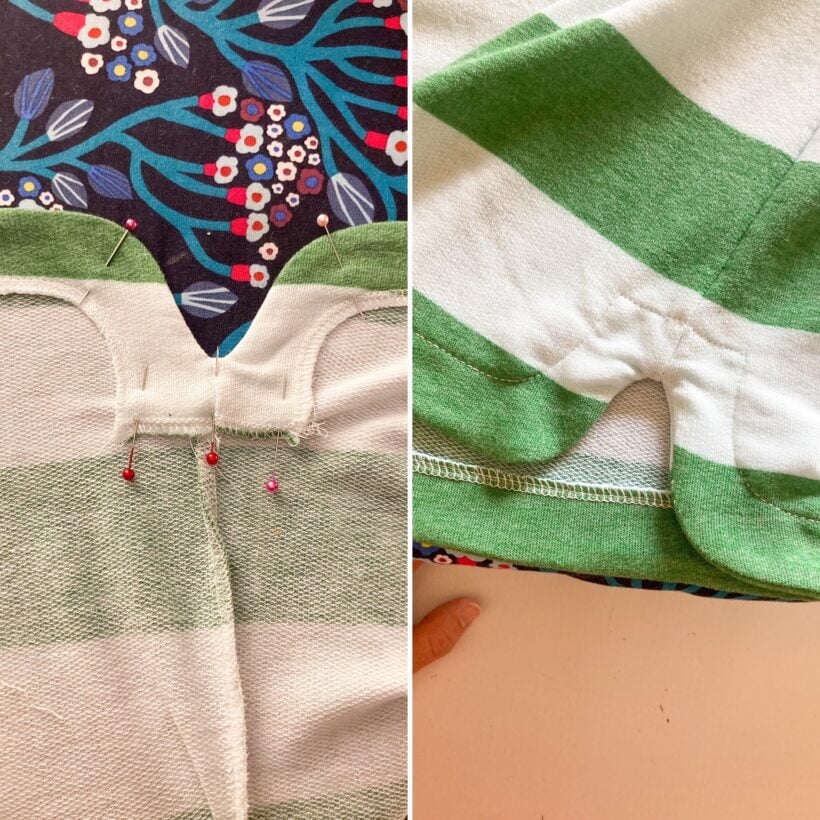
3. Lay the bottom hem facing on the bottom curved corner of the skirt body and make a mark on the facing about 1/4 inch above where the side seam stitches end. Repeat for the opposite side. These are your little side seams.
4. With right sides together, sew the 2 bottom hem facing pieces together from the top edge to the mark to create a small side seam. Press the seams open.
5. With right sides together, pin the bottom hem facing to the bottom of the skirt body.

6. Stitch around the bottom with a 1/4 inch seam allowance using a serger or stretch stitch removing the pins as you sew.
7. When you come to the side seam where the 2 curves meet, gently pull the pieces apart to straighten the raw edge. The side seam will bunch up but do your best to keep the extra fabric out of the way as you feed it through the machine. Remember to keep the same 1/4 seam allowance.

8. Press the facing toward the inside of the drawstring skirt.
9. Pin the facing in place and thread your sewing machine with wooly nylon thread on top and in the bobbin to stitch the hem. Make sure the spool is set sideways (not upright) to allow the thread to flow easily with no (or less) tension. Set the machine to a regular straight stitch and sew a little on a scrap of fabric to test how your machine sews with the wooly nylon. If your stitch line gathers as you sew, there is too much tension on your thread. Decrease your machine tension if necessary. If you are not using wooly nylonuse a stretch stitch and polyester thread for the hem.
10. From the inside of the drawstring skirt, finish the hem by stitching along the top edge of the facing, sewing within the path of the stabilizing stitches. If your stitch line gathers as you sew there is too much tension on your thread. Decrease your machine tension if necessary.
Sew and Attach the Waistband
11. Take a waistband piece and fold it in half lengthwise. Make a mark in the center of this piece about 1" from the fold. This will be where the drawstring goes.
12. Sew a buttonhole in the waistband piece at the marking.

13. With right sides together, sew the side seams of the waistband. Press the seams to one side and fold the band in half lengthwise with the wrong sides together. Using pins, mark the center front and center back of the waistband.

14. Pin the waistband to the right side of the skirt body matching the sides seams and the center front and back. Make sure the drawstring hole is facing the skirt body. Slightly stretch the waistband to be able to pin it evenly to the skirt. Sew around the waistband and leave a 4-5" not sewn.
15. Thread the elastic through the opening in the waistband using a safety pin or bodkin.
16. Stitch the ends of the elastic together and distribute it evenly within the waistband.
17. Finish sewing the waistband to the skirt body.

Make and Attach the Drawstring
18. Take the 2'' strip of drawstring fabric and fold it in half with right sides together. Sew the long edge with a 3/8" seam allowance.This means cut some off as you sew if you are using a serger. Trim the seam to 1/4'' and zig zag the edge if you aren't using a serger.
19. Take a safetypin and attach it to some string or a narrow ribbon. Drop the safety pin down inside the tube and sew across the end of the tube catching the string in the hem. backstitch a few times to make sure its caught. Turn the tube right side out by working the safety pin through the inside.
20. Thread the drawstring through the waistband buttonhole using a safety pin.

21. Try on your drawstring skirt and trim the drawstring ends to the right length after you tie the drawstring.
22. Tie a knot in the end of each draw string or stuff the raw end back into itself. Knit fabric doesn't fray so it will be fine either way.

You did it!! I hope that was helpful and not too confusing! Please send any questions my way. If you make a drawstring skirt I would love to see it! Send me a message or tag me @bluesusanmakes on Instagram #DIYdrawstringskirt
Check out my other tutorials for more SUMMER SEWING IDEAS
Happy Sewing!!