
Hello Sewing Friends! I have a new zipper pouch to share with you today. The Sparkle Pouch with my Sparkle Quilt block on the front! I love the idea of putting a quilt on everyday things and you can never have enough zipper pouches to help organize your life. But it's not just another zipper pouch. It's a symbol with intention behind it.
A reminder to sparkle - to shine and put your best foot forward. Smile - help light your world in a small way every day. To celebrate! We are celebrating the 4th of July this weekend. I love all the fireworks and festivities of this day. I'm proud to be an American. We can accomplish so much when we work together.

Maybe you are like me and need a little more inspiration to sparkle in your life. Make a Sparkle Quilt block or Sparkle Pouch with me today!
It is super simple to make. The piecing on the front takes a little extra time to cut and sew but it is well worth the effort. The pouch finishes at about 9 inches square with small boxed bottom corners.
I designed this quilt block with a little trial and error and a goal to make a wonky 9 patch star. If you look closely you can see that the red and blue versions differ slightly. I'm sharing the dimensions I used for the Red block today.
Make a Sparkle Quilt block

Supplies You'll need:
- 1 Fat Quarter of printed cotton fabric
- 1 Fat Quarter of solid cotton fabric
- 1 Fat 8th of white cotton fabric for the star
- Rotary Cutter, Ruler, and Mat
- Marking Pen or pencil
Additional Supplies for the Zipper Pouch
- 1 Fat Quarter of cotton fabric for the lining
- 2 - 9 1/2'' squares of white felt or batting
- 9 inch zipper or longer (I always use longer. It is easier)
Cutting (for the Sparkle Quilt block)
From the printed cotton cut:
- 2 strips 1 1/2'' x 14 1/2''
- 4 squares 2 3/4'' x 2 3/4''
From the solid cotton cut:
- 1 strip 1 1/2'' x 14 1/2''
- 4 squares 3 1/2'' x 3 1/2''
From the white cotton cut:
- 5 squares 3 1/2'' x 3 1/2''
Additional Cutting for the Zipper Pouch
From the printed cotton cut:
- 1 square 9 1/2'' x 9 1/2'' for the Pouch Back
From the felt cut:
- 2 squares 9 1/2'' x 9 1/2'' for the interfacing
From the lining fabric cut:
- 2 squares 9 1/2'' x 9 1/2''
Sew the Sparkle Quilt Block together
1. Using a ruler, draw a line from corner to corner on the wrong side of each 2 3/4'' square.
2. Pin a 2 3/4'' square to the corner of a solid 3 1/2'' square with right sides together.
3. Sew just to the outside of the drawn line.
4. Trim the seam allowance to 1/4'' and press the corner open. Repeat for the opposite corner with another 2 3/4'' square. Repeat for all Four solid squares.

5. Sew the 3 long 14 1/2'' strips together with the solid fabric in the center.
6. Cut the sewn strips into FOUR 3 1/2'' x 3 1/2'' squares.

7. Layout the nine patch alternating each prepared square around the center white square.

8. Take a white square and cut it diagonally about 3/8 inch away from opposing corners.

9. Use the white triangles to form the points of the star. Lay the triangle over the corner to visualize where you want the seam line to be. You can make the points short or long, just make sure you leave a 1/4'' or more at the top for a seam allowance. Flip the triangle over a allowing enough hang over on the corners so that you will be able make a full seam.
10. Sew 1/4'' away from the white edge. Fold the triangle over to make sure it covers the corner of the square below. If not, unpick the seam and try again. Trim the seam allowance to 1/4 inch. Repeat for the other point.


11. Continue sewing points onto the rest of the striped blocks.

12. Sew the squares together with a 1/4'' seam allowance to make three rows.

13. Sew the rows together to finish the Sparkle Quilt Block
Sew the Sparkle Zipper Pouch
1. Gather your zipper, lining, interfacing, and pouch backing.

2. Stack the pouch backing on top of a piece interfacing and sew around the edges to baste them together. Repeat for the Sparkle Quilt Block. You can add quilting stitches on the front if you would like. I opted to leave it plain.

3. Lay the Sparkle quilt block on the table facing up. Place the zipper tape along the top edge with the zipper teeth facing down. Lay a lining piece on top with the right side facing down. Pin or clip the edges in place.

4. Using a zipper foot, sew along the edge of the zipper teeth. This should be about a 1/4'' or 3/8'' seam allowance.

5. Flip the pouch front and lining away from the zipper and press.

6. Topstitch about 1/8'' away from the edge of the seam.

7. Lay the pouch back on the table facing up. Place the unsewn zipper edge along the top edge of the pouch back with the zipper teeth facing down. The front and back pouch pieces should be facing each other. Place a lining piece on top of the stack facing down. Pin in place. Sew along the edge of the zipper.

8. Flip the pouch front and lining away from the zipper and press. Topstitch along the seam.

9. Topstitch along the seam. Open the zipper about 2/3 of the way.

10. Match the pouch front and back together and match the lining pieces together. Pin at couple of points on each side. Using a ruler and a marking pen, measure and mark a 1'' square in the bottom 2 corners of the lining and the exterior pieces. Cut out the corners using a pair of sharp scissors.

11. Sew along the straight sides with a 1/4 - 3/8 inch seam allowance. Sew slowly over the zipper teeth, walking the needle forward with the handwheel if necessary. Leave a 3-4 inch opening in the bottom of the lining.

12. Sew each corner. Pull the front and back pieces apart and match the side and bottom seams so that the raw edges line up. Fold each seam to opposite sides so they nest together. Pin in place or use binding clips to hold them together.
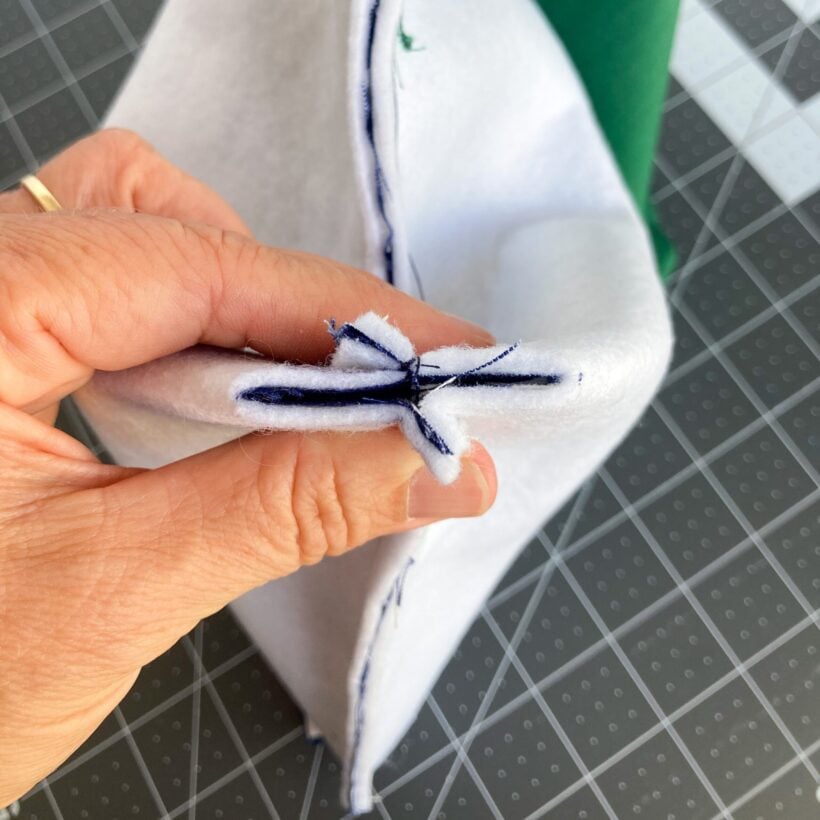

13. Sew across the opening with a 1/4 - 3/8 '' seam allowance. Repeat for all 4 corners

14. Turn the pouch right side out through the opening in the lining.

15. Tuck the raw edges of the opening to the inside and press it closed

16. Topstitch the opening closed about 1/8th inch away from the folded edge. Backstitch at the beginning and end.

And you are finished!!
Let me know what you think in the comments below. If you make one, I'd love to see it. Connect with me on Facebook or Instagram @bluesusanmakes. If you are looking for more zipper pouches in my monthly Zipper Pouch Series check out these posts.
- Ruffled Heart Zipper Pouch Tutorial
- Rainbow Zipper Pouch Tutorial
- Sunrise Zipper Pouch Tutorial
- Grow Zipper Pouch Tutorial
Happy Sewing!