
Do you know of anyone who needs a little extra love this Valentines Day? Here's a pretty zipper pouch you can make to take to your favorite 'Galentine'! Fill it with a few chocolates and you have a heart felt gift!

This pattern is great for using up scraps but if you are going to make a bunch you can grab 3 Fat Quarters and cut them out at once to make 4 pouches using the different color combinations. Come make a Heart Zipper Pouch with me!
How to Make a Ruffled Heart Zipper Pouch
Supplies You'll Need
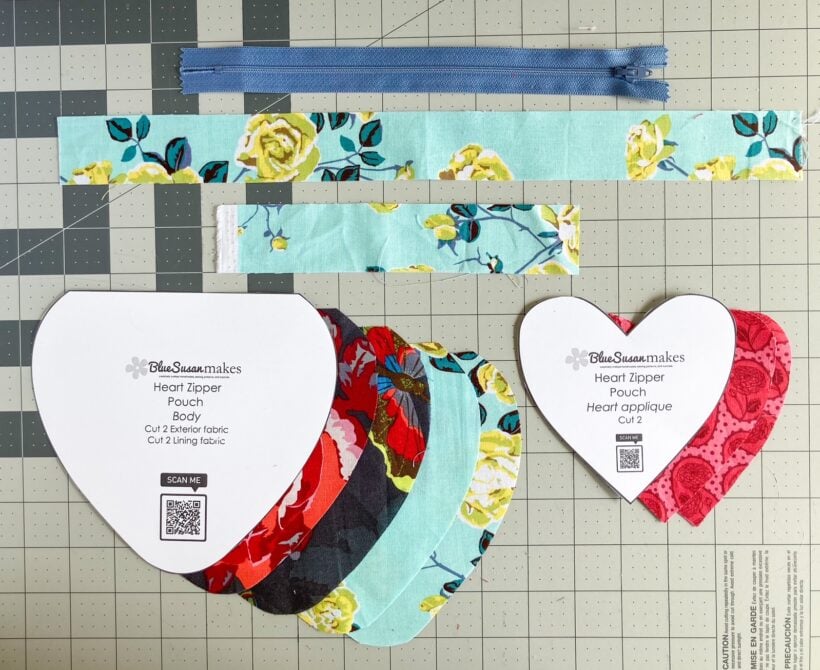
- Fabric scraps in 3 colors (about 1 Fat Quarter total) (Exterior, Lining/Center Heart, Ruffle)
- Batting or felt scraps
- 7 inch zipper in a coordinating color. (longer is ok too)
- Heart Zipper Pouch Pattern - Download HERE - Print it and Cut out the template
Cutting Instructions
From the Exterior fabric cut:
- 2 pieces using the Heart Zipper Pouch Body Template
From the Lining fabric cut:
- 2 pieces using the Heart Zipper Pouch Body Template
From the Ruffle fabric cut:
- 1 1/2'' X 22'' strip using a Rotary Cutter, Ruler, and Mat
- I had to piece mine together to get the right length
From the Center Heart fabric cut:
- 2 pieces using the Center Heart Template
From the Felt or Batting cut:
- 2 pieces using the Heart Zipper Pouch Body Template
Hot Tip: If you are making more than one Ruffled Heart Zipper Pouch you can stack up 3 coordinating Fat Quarters and cut 3 out all at once (press your fabric first, I didn't, oops). It's a little bit of a squeeze but if you use this layout below you will end up with enough pieces to make 3 full hearts and almost a 4th (you'll just need 1 extra Pouch body from another fabric).

Heart Zipper Pouch Sewing Instructions
Make the Center Heart
1. Place the 2 Center Heart pieces with right sides together. Sew around the heart with a 1/4'' seam allowance. Leave a small opening in one of the straight sides

2. Clip the curves into the seam allowance using sharp scissors and trim of the point. Don't get too close to the stitches.

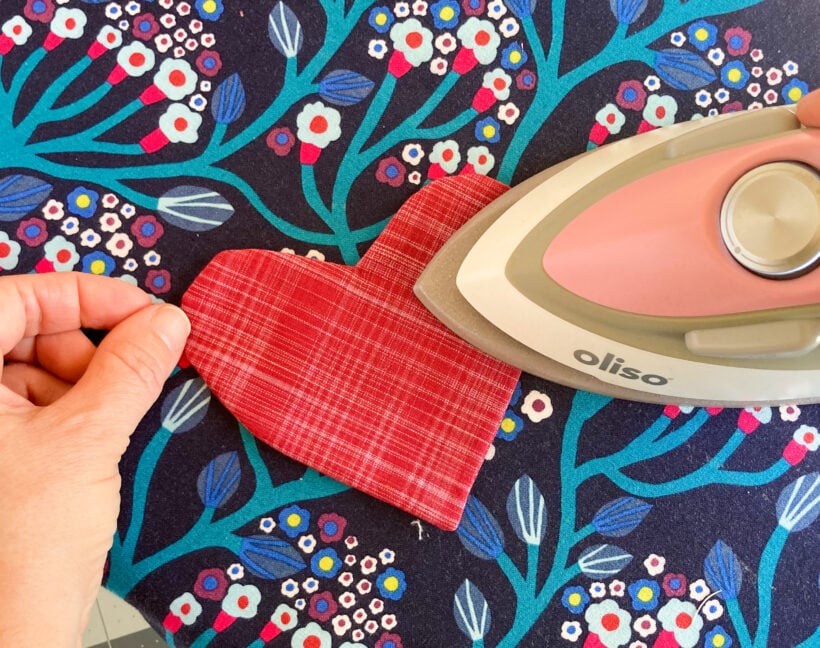
3.Turn the Center Heart ride side out. Push out the sides and seams tucking the raw edges of the opening to the inside. Press the Center Heart flat. Set aside.
4. Take the long Ruffle strip to the ironing board ( I had to piece mine together since I'm using scraps and I pressed the seam open) Fold each short end toward the wrong side 1/4 inch and press.

5. Fold the strip in half lengthwise with wrong sides together. Press.

6. Set the sewing machine to the longest stitch length. Set your sewing machine to the longest stitch length. Sew a row of gathering stitches a scant (a little less than) 1/4 inch away from the raw edge. Leave the threads long on each end and set aside.

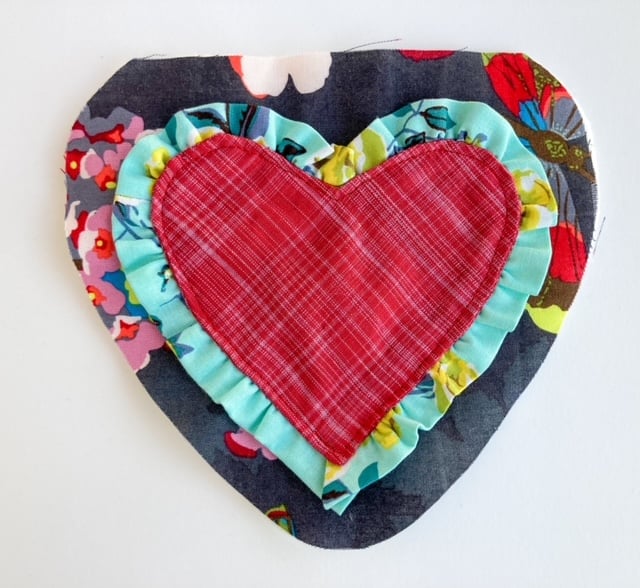
7. Place a cut piece of batting on the table. Place a piece of exterior fabric on top facing up. Center the Center Heart and pin it to the center of the exterior fabric stack.

10. Pin the center of the Ruffle strip to the center top of the heart.

11. Gently pull the top thread and gather the the ruffle to the length of one heart side. Spread out the gathers evenly. Repeat for the other half of the heart pulling the top string at the opposite end.

12. Tuck the raw edge of the ruffle just under the edges of the center heart to hide the gathering stitches. Let each end of the strip extend about 1/4'' past the bottom point of the heart with the folded end on top. Loosen or tighten the gathers as you go to get the right fit. Pin the ruffle in place. (I used a LOT of pins for this as you can see.)

13. The folded ends will overlap at the bottom and a little raw edge will show. Fold the top raw corner over so that the raw edge doesn't show and in it in place.

14. Topstitch around the Center Heart about 1/8 inch from the edge of the heart. Go slow along the curves taking just a couple of stitches at a time. Keep the needle down to pivot and turn as you go.

Sew the Zipper
15. With the Ruffled Center Heart piece laying face up on the table, place the zipper along the top edge. Make sure the Right side (teeth side) of the zipper is facing down. Place a piece of the lining fabric on top of the stack with the Right side facing down sandwiching the zipper. Pin the stack together.

16. Attach the Zipper foot to the sewing machine and adjust the needle position if necessary. Sew along the edge of the zipper with about 1/4 inch seam allowance.

17. Separate the Lining from the Exterior piece and press the fabric away from the zipper. Topstitch about 1/4 inch away from the seam line.


18. Repeat steps 11-14 for the other side of the pouch. Remember to add the piece of batting to back side of the Exterior fabric.

Finish the Heart Zipper Pouch
19. Partially unzip the zipper. Arrange the Pouch so that the Lining pieces are facing each other and the Body pieces are facing each other. The sides of the zipper will fold toward the Exterior pieces. Pin around all sides.

20. Starting at a straight side of the Lining, sew around the pouch with 3/8'' seam allowance. Leave a 2 inch opening in the lining for turning. Remember to take the curve slow and keep your needle down to pivot as you sew. Check the seam on both sides after sewing. It is easy to sew off track when sewing curves. Just sew the area again if you see something too dramatic.
Zipper tips: You should be able to sew straight over the nylon zipper but take it slow. If you go fast you may break a needle. I usually "walk" my sewing machine using the hand wheel on the side to make the machine stitch manually when I get to the zipper just in case. If you meet any resistance in the needle advance the fabric just slightly to find a spot to go through. Hope that makes sense!

21. Clip into the seam allowance around the curves of the exterior side and trim the corner. Also trim the excess zipper tape if you used a longer zipper.

22. Turn the pouch right side out through the opening and push out all of the seams to check your work. You can always unpick the opening a little to make it bigger if it's too tight.

23. Tuck in the raw edges at the opening and press the seam allowance flat. Stitch the opening closed about 1/8"away from the edge backstitching at the beginning and end.


24. Stuff the Lining inside and you are done!! Your Heart Zipper Pouch is complete. I hope you love it!!

If you make a Ruffled Heart Zipper Pouch I'd love to see it! Tag me on Instagram @bluesusanmakes #ruffledheartzipperpouch
Happy Valentines Sewing!
Quick Heart Pillow Cover Tutorial
DIY Heart Doilies
Bursting Heart Pillow Tutorial
Pixelated Heart Quilt - How to Whole Quilt Chain Piece
Valentine Heart Garland
What is the procedure to download and print the pattern for this project?
Tks.
Hi Paula! At this time I dont have a printable version to download. You could try copying and pasting the content into a word document. Not sure how many pages that would be though.