
Hello Sewing Friends! I have been sewing a lot of baby quilts this year and I've been sharing some projects where you need to add a binding to the edge of a quilt or quilted piece. I thought it would be nice to have a little tutorial here that you could reference when you need a little refresher on how to bind a quilt using a sewing machine. So I put all my tips in this post and I'm going to show you my favorite way to join the binding as well using a no-sew fold-over technique. Follow along!
How to Bind a Quilt
1. Cut strips of fabric for the binding.
- First of all, you will need to cut the strips of fabric you will use to bind the quilt. You will need enough binding strips to sew together in order to make one continuous strip long enough to go around your entire project.
- To figure out how much continuous binding strip you will need, measure around the perimeter of your project and add about 12 more inches for seam allowances and overlap.
- The width of your strip will also be determined by your project and how wide you want your finished binding to be. For a quilt using simple cotton batting, a 2 3/4" wide strip will give you about a 3/8" finished binding. Add more to the width for thicker batting or if you want a larger finished binding width.

Straight binding or Bias binding?
- If you are binding a quilt you can cut straight strips, on the grain, from your fabric yardage.
- If you are binding a project that has curved edges, you need to cut your strips on the bias. You can find an example of bias cut binding in my Sew a Soft Sunglasses Case post.
2. Join the binding strips together.
After you have your strips cut you'll need to sew them together to make one long continuous strip of fabric.
- Lay the strips end to end and cut each end at a 45 degree angle.
- Join the strips by placing them with right sides together and aligning the raw edges letting the corners hangover at least 1/4 inch.
- Stitch the pieces together from intersection to intersection.
- Press the seam open and trim the corners that extend past the straight edge.
- Repeat for all binding strips until you have one long strip.

3. Fold and press the binding strip.
Fold the strip in half lengthwise with wrong sides together and press.

4. Prepare one end of the binding strip.
Get ready to join the binding at the finish with this no-sew fold over technique.
- Open one end of the folded binding strip cut end of the strip off at a 45 degree angle. Make sure the wrong side of the fabric is facing up and point of the angle is at the top and on the left.
- Fold the cut edge to the inside about 1/2 inch and press.
- Refold and press the center fold.

5. Begin sewing the binding.
- With the back of the quilt facing up, place the angled binding end along the quilt sandwich lining up the raw edges.
- Sew the top of the triangle (single layer of binding) with a scant 3/8" seam allowance.
- Stop sewing when you get to the double layer of binding.
- Leave about 1 - 1 1/2" inches unsewn and then continue sewing the binding along the edge of the quilt.

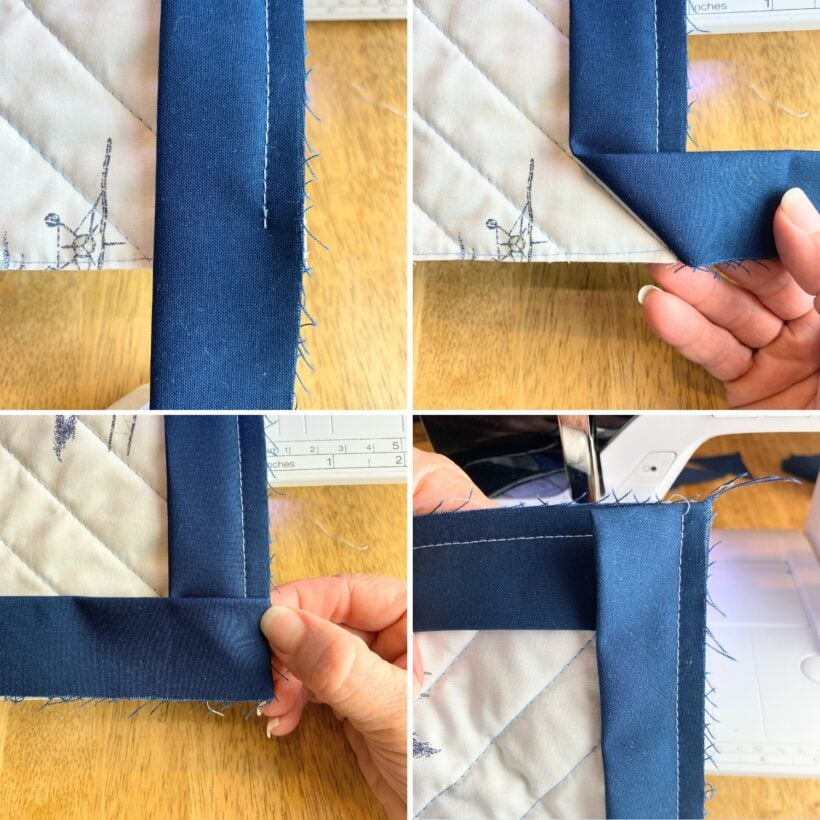
6. How to sew the mitered corners.
- When you approach the corner, Stop sewing about about 3/8" away from the corner.
- Fold the binding strip up and over to make a 45 degree angle fold.
- Then fold the strip back and line up the raw edges with the next side. The folded edge should line up with the raw edge of the first side.
- Starting at the top of the 2nd side sew with a scant 3/8"seam.
- Repeat at each corner.
7. Join the 2 ends of the binding.
- When you get back to the beginning, pause sewing and trim the binding so that it is about 3/4" past the angled fold of the binding.
- Slide the strip inside the fold of the beginning strip. the raw edges will hang over the side a little.
- Use a binding clip to hold all the layers together. Continue to sew the binding on the rest of the way, stopping and backstitching at the beginning stitch line.

- Trim off the extra binding that hangs past the seam allowance.

8. Finish the binding
- Flip the quilt over and press the binding away from the quilt.

- Fold the binding over to the front of the quilt enclosing the raw edge. Use binding clips to hold the binding in place.

- For the mitered corners, trim off a little bit of the corner at a right angle
- Fold one side over and then the other.
- Use extra clips to hold the corner in place.
- From the front of the quilt, sew around the binding about 1/8 away from the edge.
- Use a stiletto tool to help hold the corner in place. Keep the needle in the down position and pivot to turn the corner.

Backstitch at the beginning and you are done!
