
Happy Halloween sewing friends! I hope you are looking forward to some spooky fun tonight. I finished my sons Black Panther costume and got to take some pictures yesterday and today I'm telling all about my crazy adventure trying to figure out how to make this epic costume. Keep reading to see how I pulled this off as well as some very important lessons I learned along the way.

I'm calling it "epic" because of the amount of detail I put into this Black Panther costume compared some of the other costumes I've made. It could have been more epic if I had the time to make cool gloves and boots and maybe a half mask to go with it.

I'm calling this Black Panther Costume a win even with all it's flaws and hiccups. I'm just happy I got this far since the top still wasn't hooked to the bottom when we moved this week. We are in a short term rental until our house becomes available next week and thankfully I could bring my sewing machine. This was not an easy make but I'm happy to show you how I tackled it and the things I learned in hopes that if you try something like this you just may find some helpful hints.
The Makings of a Black Panther Costume
To start off with I used a pajama pattern as the base for my costume. I used the Kid's Classic Pajamas pattern from Made by Me. I knew I'd be adding muscles so I cut out a size up from the one he would normally fit into. I needed to add a zipper to the back so I just added an extra 1/2 inch to the fold when cutting it out.
For the materials I used 2 different types of stretch vinyl that I got years ago from Girl Charlee and Fabric.com when I made my Hooded Bat Cape pattern. I used the lighter weight (not as shiny) stretch vinyl for the top and the shinier heavier stretch vinyl for the bottoms. I used cereal cardboard covered in aluminum foil for the claw accents.
Making the Black Panther Shirt with Muscles
I started out by putting the shirt together with a basting stitch at just the shoulders and arm seams so I could put it on him and measure where it would make sense to draw the muscles and add the extra details. I drew the muscles for reference with chalk and then started adding all the vinyl applique details around the neck and abs using the shinier contrasting vinyl.

I googled Black Panther images to look at and copy and simplify the details. For the appliques I cut strips of vinyl and folded them in half to make a double layer and bulk them up a little bit. Glue sticks were my best friends for the appliques. They worked so well holding the vinyl in place so I didn't have to pin it.


Once the details were added to the top it was time to add the muscles. I used the same techniques, outlined in my How to Sew Muscles post, to build up and sew the muscles. Basically layering hi loft polyester batting sandwiched between 2 layers of fabric to form the muscles.

For the lining fabric I used some nylon Tricot fabric leftover from my Sew a Silky Pillowcase project. The muscles have 4 layers of batting the chest, 2 layers in the abs, 1 layer overall in the front and back and arms, 3 layers in the shoulders and 2 in the biceps/triceps.


The back also had a layer of batting but only a little detail at the neckline. I inserted a zipper all the way down the middle of the back so there was plenty of room to climb into it. This was the easy part LOL!

Making the Black Panther Costume Pants
I started by sewing them up with a basting stitch to check the fit and measure where the knee appliques should fall. I discovered that they were too tight and short in the crotch. I should have cut a size bigger. So I ended up slicing each leg piece down the center and adding an extra panel that was about an inch wide to each leg. No big deal! It just adds to the detail of the costume.

In the trying on and taking off of the pants I noticed the top layer of the vinyl was sloughing off where the fabric had stretched. UGH!! The vinyl had been sitting in my closet for 5-6 years. It must have just degraded because I know it didn't to this when I bought it. It was too late to start over, too late to get different fabric. I just had to proceed and stay, oh well. We were in the middle of packing and cleaning in preparation to move to a new house at the time and I didn't have too much sewing time left.
I added strips of the contrasting vinyl above and below the knees before I sewed the pants back together. This was the quickest part of the whole costume. Also a part that I didn't get a good picture of.
Hemming the neck and sleeves


Turning the Black Panther shirt and pants into a jump suit
Ok this was the hardest part for me. I tried sewing the 2 parts together as is but the shirt was too long in the front so it made the crotch saggy. It needed that length plus a little more in the back so that when he sat down the whole thing didn't choke him. I put the brakes on costume making for a few days while I thought about the problem, consulted my mom and sister, etc.
Part of the problem was fixed by adding the extra side panels as mentioned earlier. I decided to add an waistband strip of fabric between the shirt and pants that was the same width as the shirt, I adjusted the waist of the pants to match that width and sewed them all together.
To prevent the pants from sagging I added 3 strips of elastic in the back half of the waistband to help hold the pants up when he is walking around. I sewed the elastic in the same way I did when I figured out how to sew my Anthropologie Somerset Dress Knockoff It's not perfect. I had to adjust the elastic twice before it felt tight enough. It was a lot of unpicking. And I it's a bit uneven but oh well.

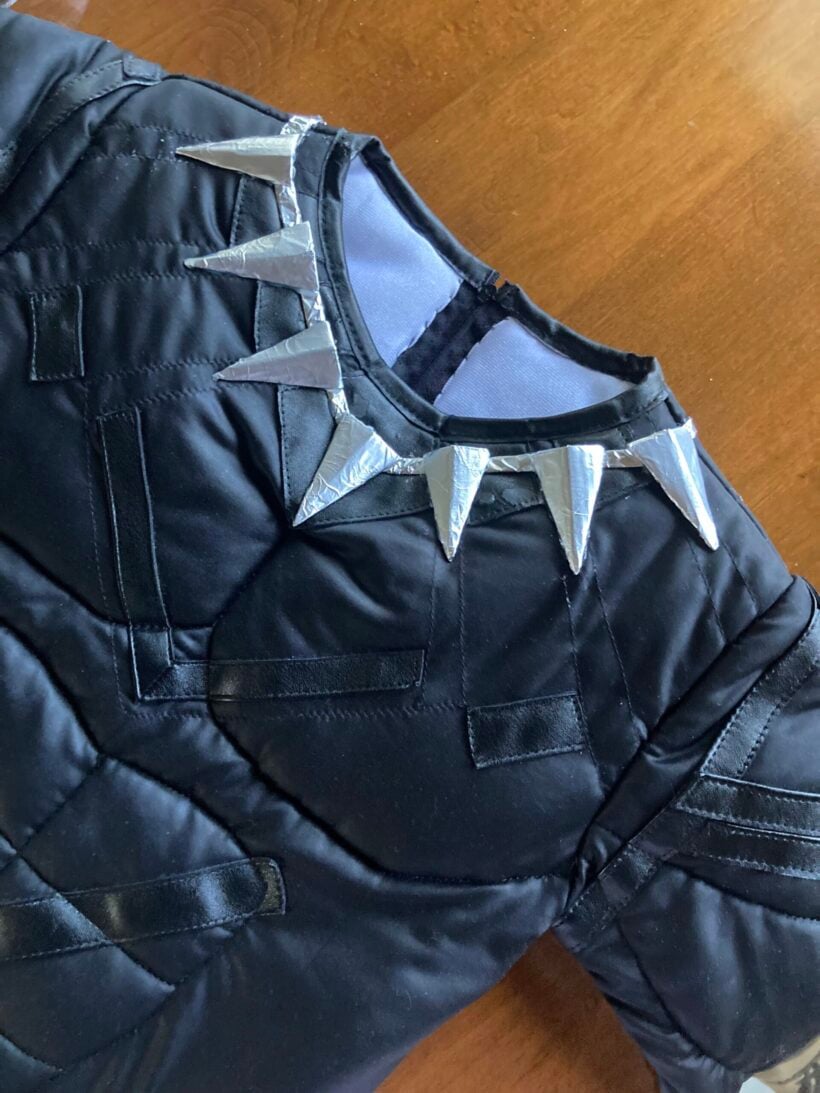
Making the Claw Necklace
I cut some triangles out of cardboard and wrapped them with heavy duty aluminum foil for the claws. The strips between the claws are foil wrapped strips of vinyl. We attached them with a glue gun but I guess we didn't use enough glue. Unfortunately, they fell off in about 10 minutes at the first wearing of the costume. The second time around I made sure to use a lot of extra glue and thankfully only one came lose tonight while trick or treating. This little detail really made the Black Panther costume feel finished,
And that's a wrap! Another costume in the books. So glad I attempted this because I learned a lot and my little boy was so excited to wear his Black Panther Costume.
My key takeaways from making a Black Panther costume
1. Don't attempt a complicated costume when you are in the middle of a move.
2. Vinyl degrades over time so maybe keeping a supply of it in my closet forever isn't such a good idea.
3. Glue sticks are my new favorite sewing notion.
4. Give yourself way more time than you think you need when making any costume.
5. Even if it's not perfect it still can be a sweet costume!
What did I miss? What did YOU learn sewing your costumes this year?
Happy Halloween!