

Make a cute zipper pouch with boxed corners! This pouch is part of my monthly zipper pouch series. It features little tabs to grab as you zip, a pieced half log cabin block on the front roomy boxed corners, Come learn how to make one!
Table of Contents

About the Project
To construct the Half Log Cabin front, I'll show you how to use a quilt-as-you-go method with a piece of felt or cotton batting as a foundation. This is the same technique we used when making the Rainbow Zipper Pouch.

The design of this pouch makes me think of the growth rings on a tree, the ripples that are made by a pebble in a still pool, and the growth of a plant that starts as a little seed. A symbol and reminder to keep going, keep working, and keep growing. And most importantly to recognize the growth I have made.

I love the boxy corners which make the pouch extra roomy! I found that this is perfect for traveling. It can hold all my makeup comfortably and the zipper will still close. What would you use it for?

I also love the leather tab on each side. It makes it super easy to zip shut. What would you use this little zipper pouch with boxed corners for?

Tutorial: How to make the Grow Zipper Pouch with Boxed Corners
Supplies You'll Need
- fabric scraps for the pouch back and front corners
- cotton batting or felt for the interfacing.
- a zipper measuring 7" or longer
- 1 inch twill tape, ribbon, or strip of leather for the zipper tabs (optional)
- a heavy duty sewing machine needle, such as a Denim/Jeans needle or a Universal 90/14
- Walking foot (optional but very helpful)
Cutting Dimensions
From the exterior fabric A
- cut 1 rectangle 3''X 4''
From the exterior fabric B
- cut 1 strip 2'' x 4''
- cut 1 strip 2'' x 4 1/5''
From the exterior fabric C
- cut 1 strip 2'' x 5 1/2''
- cut 1 strip 2'' x 6''
From the exterior fabric D
- cut 1 strip 2'' x 7''
- cut 1 strip 2'' x 7 1/5''
From the exterior fabric E
- cut 1 strip 2'' x 8 1/2''
- cut 1 strip 2'' x 9''
- cut 1 rectangle 9'' x 10''
From the lining fabric
- cut 2 rectangles 9'' X 10''
From the interfacing
- Cut 2 rectangles 9'' X 10''
From the Twill tape or ribbon (or make your own)
- Cut 2 pieces 1'' x 2'' for the zipper tabs

Sewing Instructions - Zipper Pouch with boxed corners
1. Assemble the front panel.
Lay the 3'' x 4'' rectangle in the bottom left corner of the felt piece. Place the 4'' strip on the top edge with right sides together. Stitch about 1/4 inch from the edge.

Fold the strip over and press the seam to make it lay flat. If you are using felt, avoid putting to iron onto the felt directly. It will melt.

Take the 3 1/2'' strip and place it along the other side of the rectangle with right sides facing. Sew these together with a 1/4'' seam and press open. Just make sure the side edge and the bottom edge match up. It wont matter if the top edge doesnt match up perfectly. As you will see in the next picture my bottom edges hang over more and more with the addition of each strip. oops!

Continue this process of sewing, folding, and pressing until all of the colors are pieced.

When you finish piecing the panel you may find that your piecing doesn't fit exactly on the foundation because of shifting or inconsistent sewing. You can cut off any extra edges Just make sure to square up the panels and cut the other pieces to match the new size.

Now you should have all your pieces ready to make the pouch.

2. Cut a square out of each panel corner.
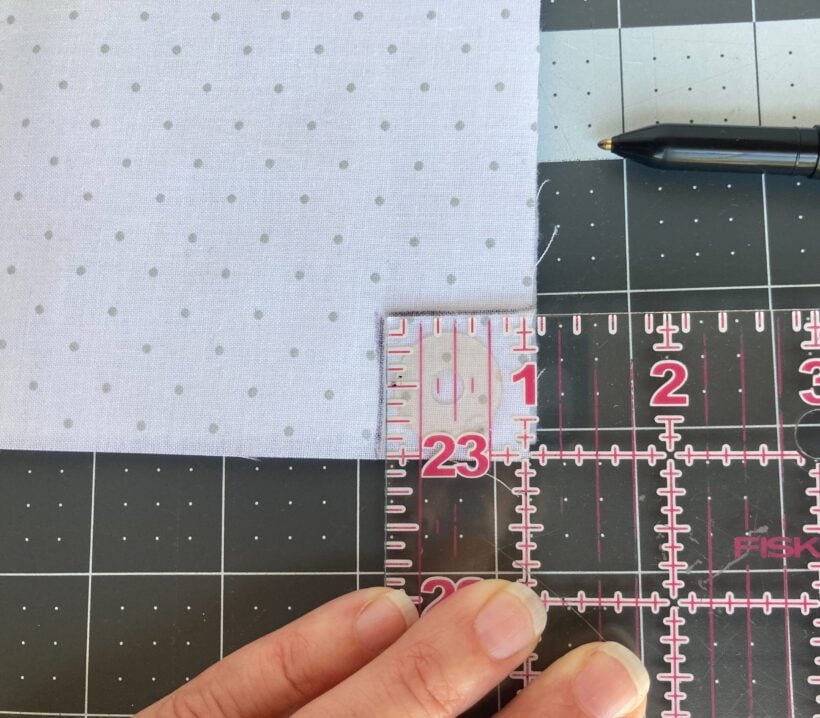
Cut a 1 inch square out of each panel. I find it easiest to stack up an exterior and lining piece together to cut at the same time. Use the corner of your acrylic ruler and a marking pen to draw a 1 inch square at each corner. Use a pair of sharp scissors to cut away the corner.
Baste the back exterior panel to the other piece of felt and treat it as one piece.

3. Insert the zipper
Place an exterior panel face up on the table. Place the zipper along the top edge with the zipper teeth facing down. Let the zipper hang over on each side if your zipper is long enough. Place a lining piece, face down, over the zipper and pouch front. Make sure the both panels line up. Pin or clip in place. You created a little zipper sandwich.

Change the foot on the sewing machine a zipper foot. Stitch along the zipper about 1/4''-3/8'' inch away from top edge. Move the zipper slide out of the way as you sew if necessary by leaving the needle in the down position while you make adjustments.

Fold the pouch front away from the zipper and press.

Topstitch along the pressed edge about 1/8'' away from the seam line.

Place the other lining panel face up on the table. Line up the other side of the zipper along the top edge with the sewn lining panel facing the other lining panel on the table. Pin and sew along the zipper using a zipper foot.

Fold the panels away from the zipper and press the seam flat.

Topstitch along the seam line. Open the zipper about half way and sew back and forth across the open ends to baste the zipper together.

4. Sew the Side seams
Place the exterior panels together with right sides facing each other. Pin the side seams and sew them together with a 3/8'' seam allowance. Do the same with the lining panels. Use your fingers to press all the side seams open.

5. Sew the zipper ends to make a boxed corner top
Working on one end of the zipper, pull the lining panels apart and line up the side seam with the zipper. Shift the seams until the raw edges of the opening line up. Temporarily pin these place.

Do the same with the exterior pieces and soon you'll have a stack of raw edges with a zipper end sticking out of them.

5 a. Optional: Insert a Tab into each side
Fold the 2 inch piece of ribbon or leather in half to make a loop. Slide it into the opening of the exterior side and line up the raw edges. Use a binding clip to hold everything together on one side. Repeat for the opposite zipper end.


Make sure your machine has a heavy duty needle on it. Use a Jeans/denim needle or the largest universal needle you have. Us a leather needle if you are sewing through leather.
This is a very thick seam. Use the handle of your scissors to 'hammer' the seam and compress it a little before sewing. Sew through all the layers of fabric with a 3/8 inch seam allowance. As you sew, use the side wheel on your machine (instead of your foot pedal) to advance the stitches through the zipper to prevent breaking the needle.
My machine will sometimes skip stitches at the thickest part. That's ok! Sew this seam 2 or 3 times. The 2nd time will be easier. Repeat for the other zipper end and trim off the excess zipper ends.

6. Sew the bottom seams
Realign the exterior pieces and pin the bottom edges together. Sew the bottom together with a 3/8 inch seam allowance. Finger press the bottom seam open.

Line up the bottom edge of the lining pieces. Sew this seam together but leave a 3-4 inch opening in the middle. Finger press the bottom seam open.

7. Sew the boxed bottom corners
Pull apart the lining and line up the side seam with the bottom seam. Shift the seams until the raw edges line up.

Sew the seam together. Repeat for all bottom corners

8. Turn the pouch right side out through the opening and finish the pouch.
Push out the corners of each seam and check that every thing is secure.

Pull the lining out and fold in the raw edges of the opening. Press the edges and stitch it closed.

And you are finished! This zipper pouch with boxed corners is perfect for stashing a first aid kit, snacks on the go, travel supplies, or keeping odds and ends organized in your bag. What will you use yours for?
Topstitch the opening closed.
Leave a comment and let me know what you think! If you liked this tutorial share it with a sewing friend or Pin it for later! If you make a Grow Zipper Pouch I'd love to see it!! Tag me @bluesusanmakes and use the hashtags #growzipperpouch #bluesusanmakes.
Connect with me on Facebook or Instagram and let me know if you enjoyed this sewing tutorial.
Happy Sewing!
Did you like this tutorial? Check out the others in the series so far.
- Rainbow Zipper Pouch
- Ruffled Heart Zipper Pouch
- Sunrise Zipper Pouch Tutorial
- Sparkle Zipper Pouch tutorial


