
Hello Sewing Friends!! Today I'm sharing an easy little stuffed bunny tutorial to make a bunny that fits in your pocket or the palm of your hand. A perfect addition to an easter basket or to add to your little one's stuffed animal collection.
Have you heard of Palm Pals? My 10 yo is obsessed with these cute little stuffed animals and I thought it would be fun to make a little bunny pal for Easter this year.
DIY Stuffed Bunny Tutorial
Supplies
- 1 fat quarter of quilting cotton
- Small scrap of contrasting fabric for the nose
- Small scrap of Heat n Bond lite or other iron on fabric adhesive or fusible webs
- polyester fiber fill
- Needle and thread
- erasable fabric marker - Frixion Pen
- Cotton batting scraps
- Pinking shears - optional
- 1/2 inch turning tool
- Print and Cut out templates
Stuffed Bunny Tutorial Instructions
Cutting
Cut out the body, arm, and ear pieces from the Fat Quarter. Use a rotary cutter to cut out the pieces using the templates or trace them and use scissors to cut them out like I like to do.
- 2 pieces using the Little Bunny Body template
- 4 pieces using the Arm template
- 4 pieces using the Ear template

Sewing the Little Bunny
1. Stack up the ear and arm pieces in sets of 2 with right sides together and pin them to the top of 2 layers of batting

2. Sew around each set with 1/4 inch seam allowance leaving the straight end open. Backstitch at the beginning and end. Keep the need down as you lift the presser foot and pivot to sew around the curve.

3. Cut away the excess batting. Clip around the curves or trim them with pinking shears.
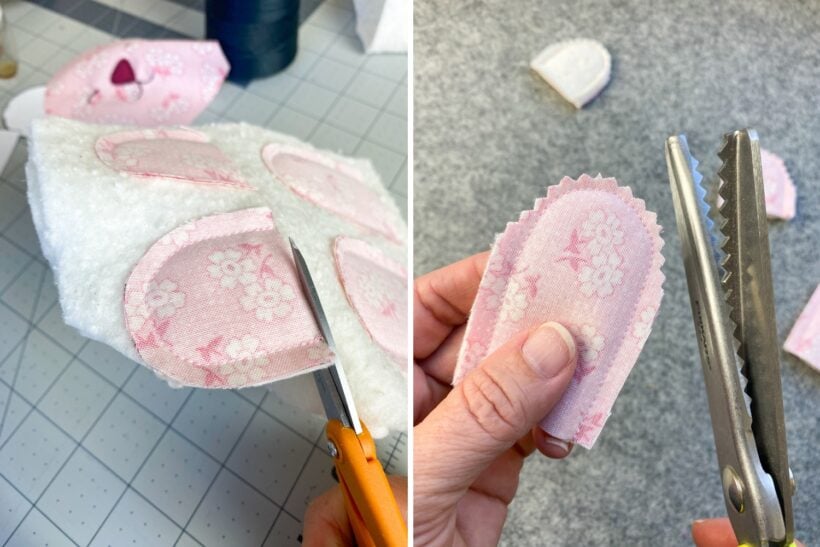
4. Turn each piece right side out using the turning tool. Push out the seams and press both sides

5. Trace the nose onto the paper side of a scrap of Heat n bond lite or another fusible fabric adhesive. Roughly cut around the traced nose. Cut the nose out right on the line. Peel off the paper backing. Fuse it to the wrong side of the nose scrap fabric. Checkout How to make a Fusible Fabric Applique for a more detailed description.

6. Position the nose in the center of one of the body pieces and fuse it using a medium warm iron. I placed the template underneath and I could kind of see the lines through the fabric.

7. Trace the little bunny eyes and mouth onto the fabric using a erasable fabric marker. I used a Frixion pen.

8. Sew around the nose and then sew along the eye and mouth lines back and forth a few times. I sewed over the eye lines 3 times and the mouth lines twice. Just go slowly and sew right on top of the line keeping the needle down and lift the presser foot as you turn. I used black thread so you could see better but feel free to match the thread to the nose color use whatever color you'd like. You could also hand stitch the lines using embroidery thread.

9. Place the bunny face on top of 2 layers of batting. Pin the ears to the top in the center leaving about a 1/4 inch gap between the 2 ears. Pin an arm on each side. Sew a basting stitch along the ears and arms.

10. Place the 2nd body piece top of the arms and ears with the right side facing down. Pin in place.

11. Sew around the body leaving an opening in the bottom. Clip along the curves in the spaces between the arms and ears and clip the corners at the bottom.

12. Turn the bunny right side out. Its easy to reach in and pull the ears right out to get you started.

13. Push out the seams using a blunt stick.

14. Separate the 2 layers of batting on the inside and add stuffing between the 2 layers. Stuff the body firmly.

15. Another fun idea is to fill the bunny with beans or rice to make a little been bag out of it.

16. Stitch up the bottom seam and you are done!! Isn't it so cute!!

Leave me a comment and let me know if you make one of these.
Happy Sewing!