

Showing posts sorted by date for query tutorials. Sort by relevance Show all posts
Showing posts sorted by date for query tutorials. Sort by relevance Show all posts
Soccer Mom: Super Easy Sleeve Tie Tutorial
Sunrise Zipper Pouch Free Pattern & Tutorial
.png "Sunrise Zipper Pouch Free Pattern & Tutorial")
Spring Bunny Bunting
-3.jpg "Spring Bunny Bunting")
Hello Sewing Friends! I'm here to share a little tutorial for a fun Spring Bunny Bunting to hang up for the Easter season. I feel like something is missing in my holiday decor if I don't have some sort of banner hanging up. This one is super easy and has hardly any sewing at all. Get together with some friends and make one this week!
Rainbow Zipper Pouch Tutorial

Tom - the Hero from Beast Quest Costume

Hello Sewing friends! Anyone else have a "Halloween hangover"? Too much junk food for me. I'm showing off my son's finished costume today. Introducing Tom, the hero from Beast Quest.
How to Sew a Wristlet Key Fob

I Am A Soccer Mom : Soccer/Camping Chair Cover Tutorial

Hi friends! I'm back today with another sewing tutorial for the Soccer Mom Series. Everyone uses camping chairs to sit on the sidelines at soccer. The chair covers are always poor quality and rip out before the chair dies, leaving you with a perfectly good chair but no easy way to carry it.
Soccer Mom Series: 5 Tips to Get You out the Door On Time

Soccer Mom: Drawstring Backpack Tutorial

Today I'm sharing a tutorial on how to make an easy to sew drawstring backpack. We need a few of these over here to pack shoes, shin guards and a change of clothes for the days we go straight from school to soccer.
Road Trip Toiletry Bag PDF Sewing Pattern

I made a fun project this month that I get to share with you today. It's a Toiletry Bag for Dad, just in time for some Father's Day sewing. I don't know about you but the Dad's in my life are hard to sew for, but this is the perfect gift. Manly on the outside, personalized and fun on the inside.
How to Clean a Self Healing Cutting Mat

Hello Sewing friends! Does your cutting mat ever get filled up with fibers from cutting fabric or batting? Today I'm going to show you the easiest way to get those fibers out and clean up that messy dirty mat.
Soccer Mom Series: Waterproof Blanket Tutorial

Hi everyone! Have you ever sat down on grass that you thought was dry only to feel water seeping through your pants after you've sat there for a minute? No fun! Well today I'm sharing a little blanket you can make to sit on so that will never happen again!
Summer Sewing Inspiration: Easy Summer Tote Remake

Today I want to share with you my favorite piece of advice... Don't be afraid to try something new! Don't be afraid to experiment! Even if you fail, you'll always learn something along the way. And if you succeed there is no greater sense of accomplishment. One of my favorite things to do is take a tutorial and put my own spin on it. I have a little example to show you today of how I did just that with my old Summer Tote tutorial.
Knockoff Anthropologie Somerset Maxi Dress Tutorial
.jpg)
I finished my Knock off Anthropologie Somerset dress! I'm really excited that I was able to pull this one off. Today I'm sharing which patterns I loosely used, the fabric I chose, and things I learned making it. Keep reading for all the details and an explanation of my steps so you can make one too.
Play Ball!!! A Team Banner Tutorial

In my neck of the woods 'tis the season for Spring Baseball. Though my boys aren't playing ball this season, I was asked to make a team banner just like the one I made for Jack's T-ball team last year. Come learn how to make one just like this!
4 Easy DIY Face Mask Tutorials
Hello!!! I'm jumping in the mask making frenzy and I keep getting asked by my non-sewing friends what is a good tutorial to use. So I thought I'd do a quick round up review of some of the ones that I have tried. A couple things to think about before making your home made mask. I found a good article on an NBC site that suggests using a double layer heavyweight quilting cotton material instead of knit fabric is best. It even suggests that a layer of flannel in between increases the virus filtration. There are many tutorials out there that use elastic loops to go around the ears. The word on the street is that the elastic behind the ears gets painful after a while so if you are making these for Healthcare workers opt for ties instead of elastic. Ties make the fit more adjustable as well. I used to be a surgical nurse and it is really not as hard to tie these on as you think it might be. Also if you are making masks to donate to Healthcare workers please contact the facility to see if there are any specifications that they require and if they are actually taking donations. In our area there is a local facebook group that is coordinating orders. Take a look, you might have one for your area too.
First up is this simple pleated mask by Dana from MADE EVERYDAY. I love her tutorial because it is simple and easy to follow. It includes instructions for ties or elastic, as well as multiple size option. I would say this style is probably the best and easiest if you are making them for yourself to help prevent spread of the virus if you have to go to work or to the store. This tutorial is easy to follow and she has a video too! Find her awesome tutorial HERE.

Next up is this molded version called the Olson Mask. Caroline of Sew Can She made a beautiful tutorial for this mask. The construction is a little more complex but it includes instructions for inserting a removable filter as well. It is more fitted than a pleated face mask and may be the option you are looking for. She also has a great video explaining the process. Check out her tutorial HERE

This next tutorial is also for a fitted mask but is constructed a little differently. It is designed by Suzanna of Hold it Right There. I like this one because it is specifically designed to go over a N95 mask to help prolong the life of those that have to be reused. It is simple and comes with a variety of sizes and tie options as well. However, this pattern is only for use for those making masks for the Healthcare workers. This feels to big and strange to be worn on it's own anyway Download the pattern HERE if you are sewing for your local health care facility.

One last tutorial I found a super simple mask designed by Bijou Lovely for the Million Mask Challenge. You can read all about the project and help make masks to donate.

I hope these are helpful!! Signing out not to go sew a mask! Stay healthy everyone!
**Remember none of these masks are intended to be used as sufficient protection by themselves. Please follow the CDC and WHO guidelines if you are making one for yourself or family member.**
First up is this simple pleated mask by Dana from MADE EVERYDAY. I love her tutorial because it is simple and easy to follow. It includes instructions for ties or elastic, as well as multiple size option. I would say this style is probably the best and easiest if you are making them for yourself to help prevent spread of the virus if you have to go to work or to the store. This tutorial is easy to follow and she has a video too! Find her awesome tutorial HERE.
Next up is this molded version called the Olson Mask. Caroline of Sew Can She made a beautiful tutorial for this mask. The construction is a little more complex but it includes instructions for inserting a removable filter as well. It is more fitted than a pleated face mask and may be the option you are looking for. She also has a great video explaining the process. Check out her tutorial HERE
This next tutorial is also for a fitted mask but is constructed a little differently. It is designed by Suzanna of Hold it Right There. I like this one because it is specifically designed to go over a N95 mask to help prolong the life of those that have to be reused. It is simple and comes with a variety of sizes and tie options as well. However, this pattern is only for use for those making masks for the Healthcare workers. This feels to big and strange to be worn on it's own anyway Download the pattern HERE if you are sewing for your local health care facility.
One last tutorial I found a super simple mask designed by Bijou Lovely for the Million Mask Challenge. You can read all about the project and help make masks to donate.
I hope these are helpful!! Signing out not to go sew a mask! Stay healthy everyone!
Quilty Penelope Bag
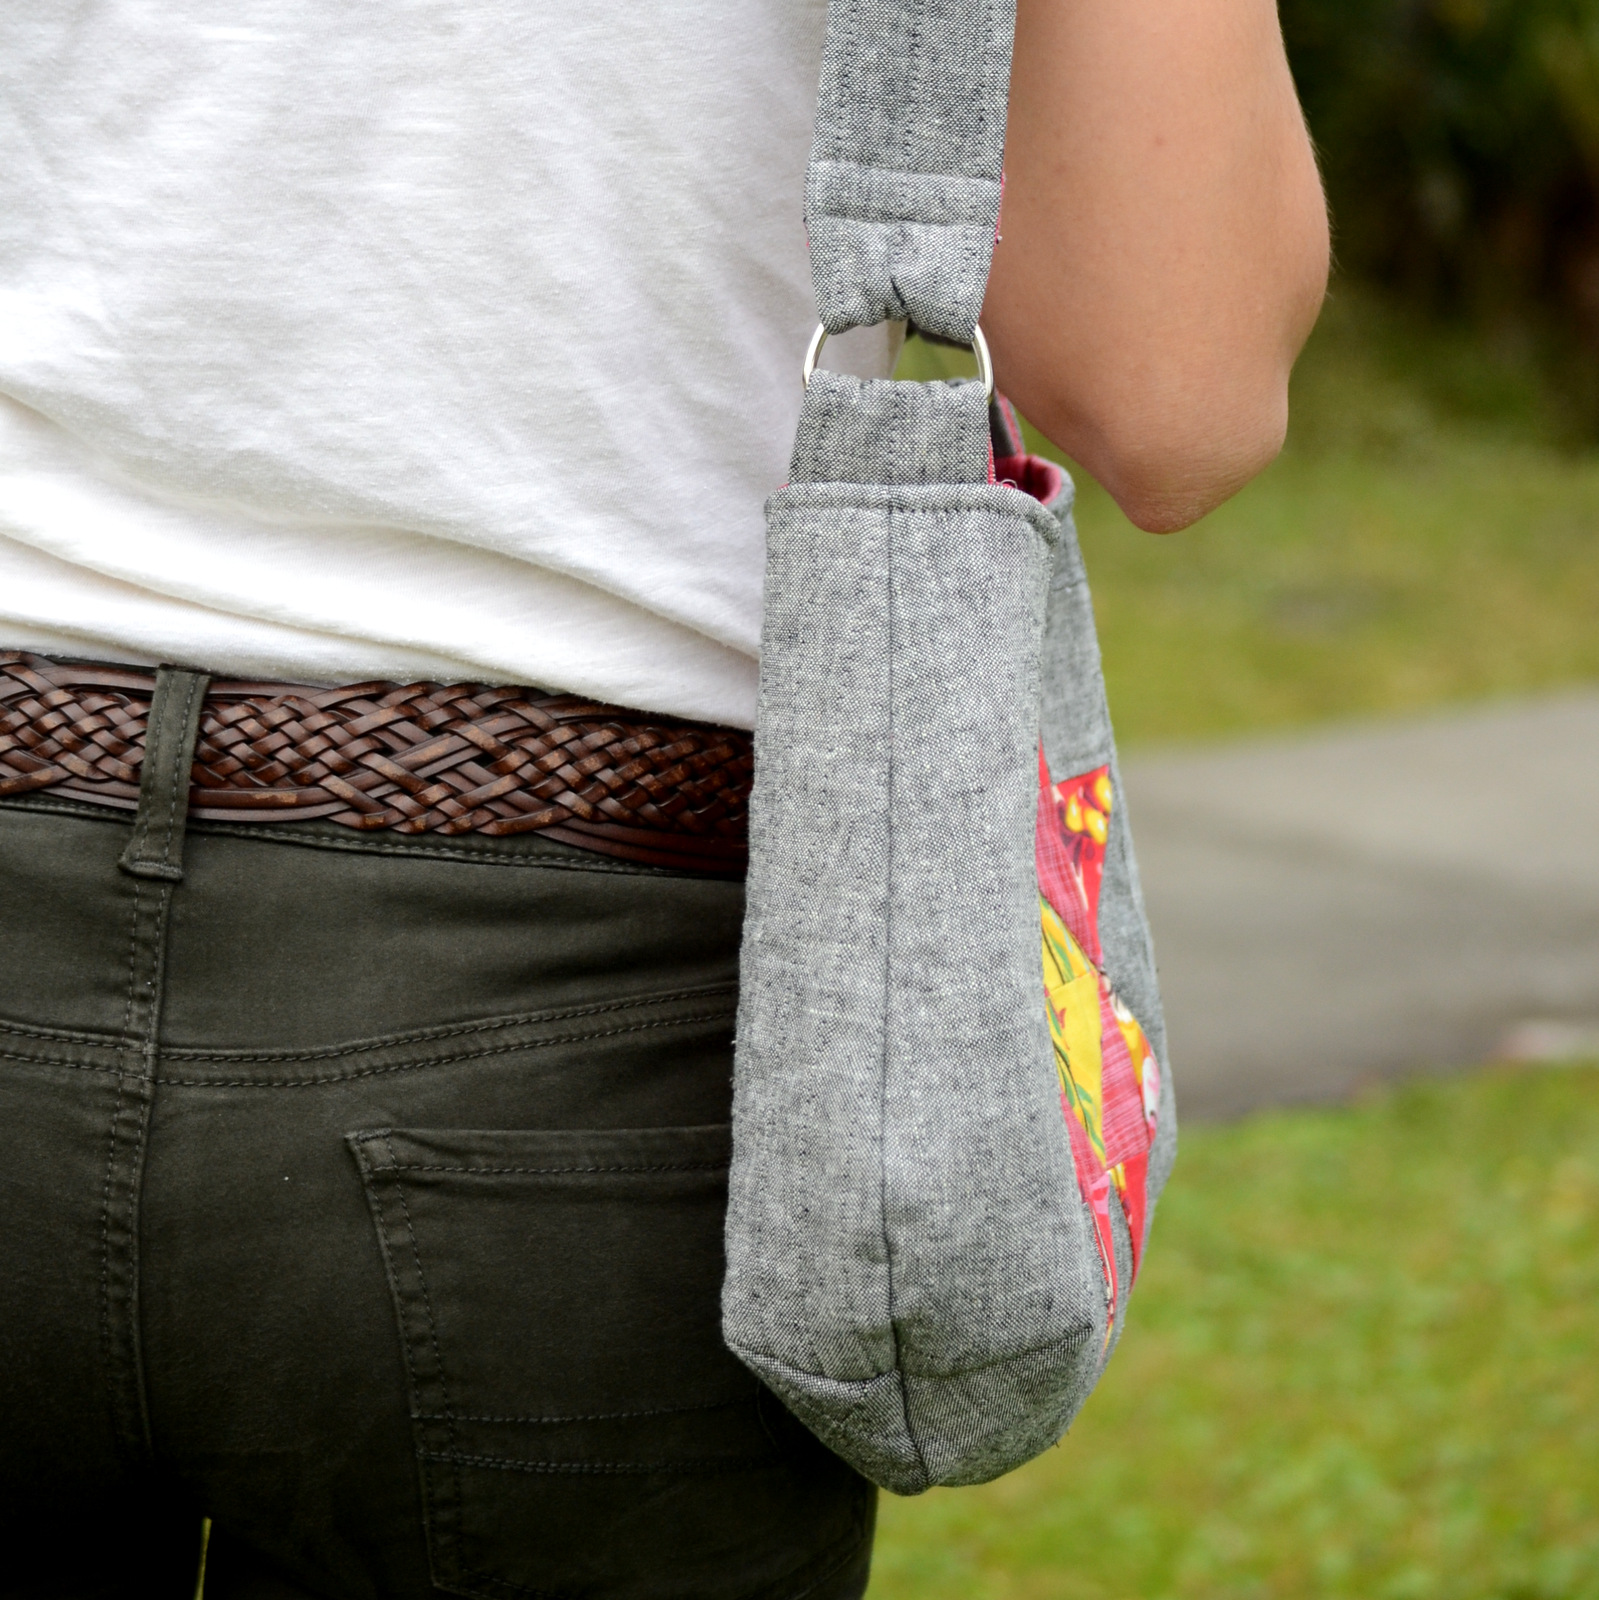
Hello sewing friends. I get to be the guest designer this month for Patchwork Posse's online Quilt Guild and I'm so excited to share with you the project I've created for it. I've added a little "quilty" flare to my Penelope handbag and turned it into a PDF pattern to share. Introducing the Quilty Penelope Bag.

The handbag has a Variable star built into the side panels, giving it a pop of color and a cute way to show off your love of quilting. The star panel is great for using up some of your scraps or for playing around with your new favorite fabrics. You can also substitute an 8”, or larger, orphan block to the center panel for a completely different look.

The Quilty Penelope Bag is perfect for carrying all your essentials, plus a few extras. It’s small enough that it won’t weigh down your shoulder, but roomy enough to hold what you need.

There are pockets on the inside and a simple magnetic snap closure. The comfortable fabric strap stays on your shoulder and easily slips on with one hand.
This pattern is written exclusively for Patchwork Posse's online Quilt Guild. Are you a member yet? You may want to consider joining. Not just for my pattern but for access to all the other exclusive patterns, tutorials, Block-of-the-Months, and giveaways that come along with membership.
There's also a facebook group where you can show of your projects and get feedback and fun swaps you can participate in. It's just like being part of a local quilt group but with the convenience of your own schedule. You'll find all the details about how to join on the Quilt Guild Info Page
You can read more about me and my project on the Guest Designer page. Sign up and download my Quilty Penelope Bag pattern and let me know what you think.
Happy Sewing!
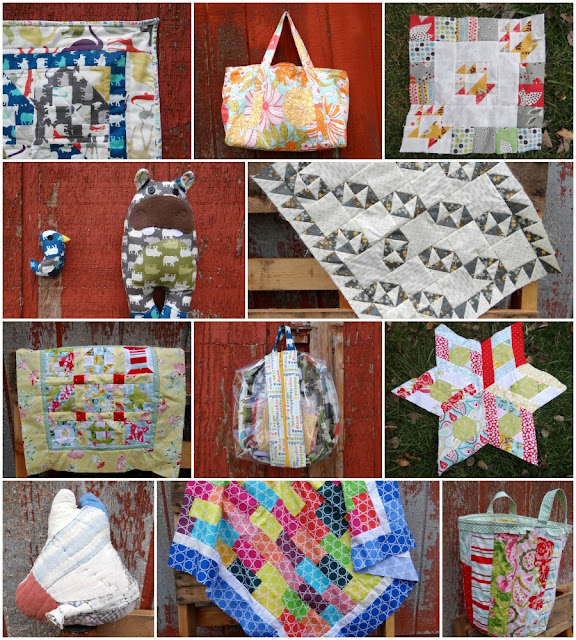
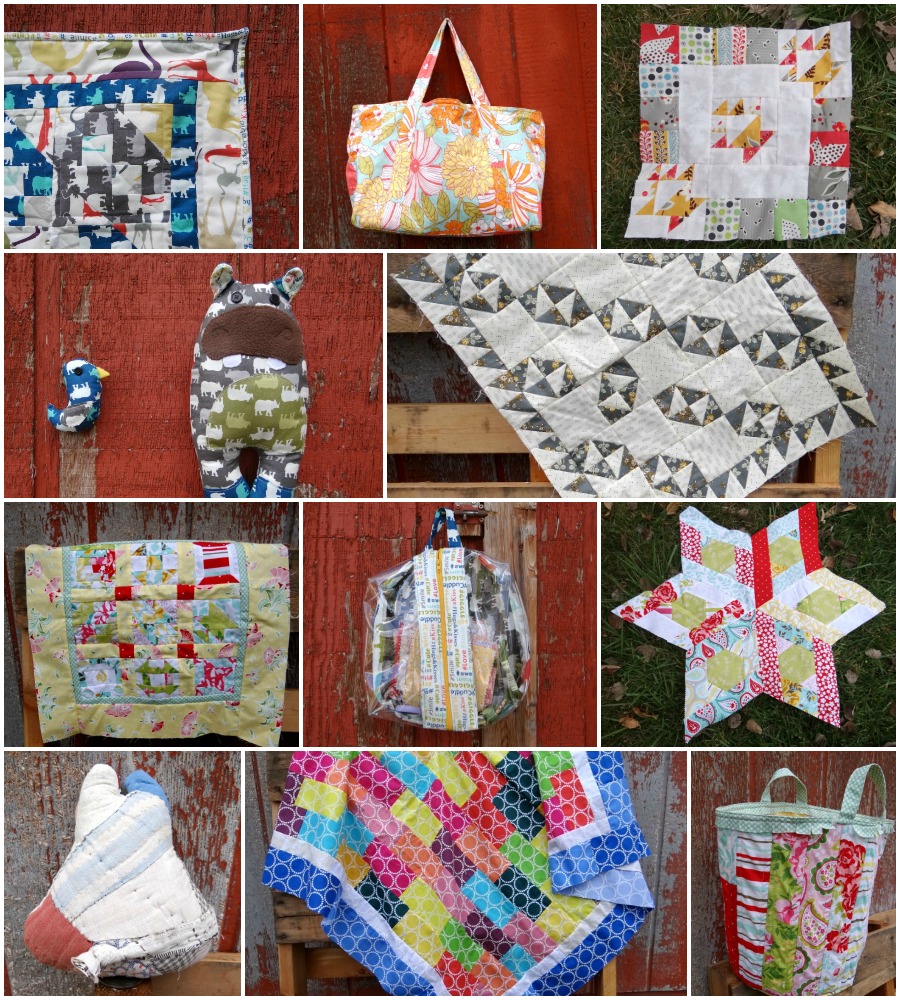
More Handmade gifts in the Etsy Shop
Rachel has been sewing up a storm and filling up our Etsy Shop. Woohoo!! She's been working so hard I thought I'd show off some of her stuff. But before I get to that I just want to let you know that I get to be the curator for the Handmade Holiday on Sew Mama Sew today. Click over to their website to see my list of must sew Handbag tutorials for everyone on your gift list this year.


This bag is called the Vinca Zip Top bag. It has a pretty piecing on the front and back.


The inside has a zipper pocket and slip pockets and the top stays closed nicely with another lovely zipper.


She also sewed up some coordination Girlfriend Clutches.


This is the Pleated Shoulder Bag in Purple Zebra. I love it's simple design and I think the zebra pattern on that purple fabric is cool.

The inside of this one has a zipper pocket and some slip pockets as well.

And one more Pleated Shoulder Bag.


She also listed a bunch of Painter's Clutches. You can find more info about the Painter's Clutch in this post.

The inside of all of them has an invisible snap and a divider like pocket so you can keep your keys and phone separate

Okay now for some Handbag goodness.


The inside has a zipper pocket and slip pockets and the top stays closed nicely with another lovely zipper.

The piecing on this Vinca is a little different than the first. I just love the way it turned out with the zippered top.

She also sewed up some coordination Girlfriend Clutches.


This is the Pleated Shoulder Bag in Purple Zebra. I love it's simple design and I think the zebra pattern on that purple fabric is cool.

The inside of this one has a zipper pocket and some slip pockets as well.

And one more Pleated Shoulder Bag.


She also listed a bunch of Painter's Clutches. You can find more info about the Painter's Clutch in this post.

The inside of all of them has an invisible snap and a divider like pocket so you can keep your keys and phone separate

You can find more details on all of these bags in the Shop.
Happy Browsing!
Tagged!- Around the World Blog Hop
Tag I'm it! I was tagged by my friend and co-author Caroline to participate in the Around the World Blog Hop. Caroline is the brains behind SewCanShe.com. She is one of those people who can accomplish an amazing amount of work in a day. She scours the web to find great tutorials to share with you in her daily newsletter, as well as keeping up a great blog where she shares a ton of her own free tutorials. In the mean time she is writing a new book and she's a mom of 4. There is no limit to what this gal can do. Go check out her blog hop post HERE. It's fun to see a few behind the scenes pictures of her as well.
So basically for this blog hop I get to tell you all a little bit about myself, and what I like to create.
What I'm working on....
Well, currently I'm working on snuggling this little newborn (I'm now a mother of 5!) and doing my best to finish unpacking boxes in our new house, (we moved the week after he was born, which was slightly insane).

So I've been busy doing some non-sewing related things over the last month. Don't worry I have plenty of projects on the back burner just waiting to be finished up. I love to design handbags and I have always wanted to write up my own patterns. I have a couple of patterns in our new book, Just for You: Selfish Sewing, but have 2 more mostly written that I just need to finish up a few things for.


I also have a finished quilt top that is waiting to be quilted, here's a picture of it in process. I call it the Bejeweled Churn Dash.
 I have big plans to use up more of my quilting cottons this year to make scrappy quilts. My UFO list seems infinite. I'm way better at starting projects than actually finishing them.
Why do you write/create what you do?
I'm going to interpret this as why do I sew? I sew for a few reasons...
1. It keeps me sane. It is just the creative outlet I need to keep me balanced and ready to tackle the mundane daily chores of keeping house and the challenges of parenthood.
2. It is challenging. I like trying to figure out how things are constructed. I'm always looking at peoples bags and thinking about how I would put them together.
3. I LOVE fabric! "Love" might be an understatement here. I get a little rush when I go to a fabric store. It's just all so beautiful. I love how colors play together. Colorful fabric makes me happy!

How does your writing/creating process work?
I frequently think about how I want to make something when I'm going to sleep at night. I also solve my sewing puzzles by just digging in a sewing them up and unpicking along the way. Sometimes I have moments of brilliance when I figure a way to make something that is so quick and clever that I find myself saying "I'm a genius". Like the time I needed a light colored slip to go under a skirt on my way out the door to go to church. I took an old silky pillowcase, cut off the bottom seam and threaded some elastic through the hem. I was so excited I found myself saying "I'm a genius". It happened again today when I sat down to write this blog post and my little guy started crying. I needed two hands to type. I needed a sling! Which I'm planning on buying or making, but who am I kidding, I needed it right now. So I went to the giveaway box, pulled out my husbands old shirt and chopped the top off. Instant sling that took my 30 seconds to make.


So basically for this blog hop I get to tell you all a little bit about myself, and what I like to create.
What I'm working on....
Well, currently I'm working on snuggling this little newborn (I'm now a mother of 5!) and doing my best to finish unpacking boxes in our new house, (we moved the week after he was born, which was slightly insane).
So I've been busy doing some non-sewing related things over the last month. Don't worry I have plenty of projects on the back burner just waiting to be finished up. I love to design handbags and I have always wanted to write up my own patterns. I have a couple of patterns in our new book, Just for You: Selfish Sewing, but have 2 more mostly written that I just need to finish up a few things for.
My Garden Tiles bag and the Tulip Tote.
Why do you write/create what you do?
I'm going to interpret this as why do I sew? I sew for a few reasons...
1. It keeps me sane. It is just the creative outlet I need to keep me balanced and ready to tackle the mundane daily chores of keeping house and the challenges of parenthood.
2. It is challenging. I like trying to figure out how things are constructed. I'm always looking at peoples bags and thinking about how I would put them together.
3. I LOVE fabric! "Love" might be an understatement here. I get a little rush when I go to a fabric store. It's just all so beautiful. I love how colors play together. Colorful fabric makes me happy!
How does your writing/creating process work?
I frequently think about how I want to make something when I'm going to sleep at night. I also solve my sewing puzzles by just digging in a sewing them up and unpicking along the way. Sometimes I have moments of brilliance when I figure a way to make something that is so quick and clever that I find myself saying "I'm a genius". Like the time I needed a light colored slip to go under a skirt on my way out the door to go to church. I took an old silky pillowcase, cut off the bottom seam and threaded some elastic through the hem. I was so excited I found myself saying "I'm a genius". It happened again today when I sat down to write this blog post and my little guy started crying. I needed two hands to type. I needed a sling! Which I'm planning on buying or making, but who am I kidding, I needed it right now. So I went to the giveaway box, pulled out my husbands old shirt and chopped the top off. Instant sling that took my 30 seconds to make.
I love solving problems with sewing!
That's enough about me, I'm tagging my friend Becca at Bryan House Quilts. I love her quilts and her color aesthetic. She has a new book coming out too, which I can't wait to get my hands on.
Here's her bio:
Becca shares her creative journey and missteps over at Bryan House Quilts. She is a quilt pattern designer and her first book, Modern Rainbow: 14 Imaginative Quilts that Play with Color, is due out in only a month. She has 4 young children - 3 girls and a boy - and recently moved from Houston to St. Louis.
Check out her blog next Friday to for her stop on the blog hop.
Happy Sewing!
Lickety Split Skirt
My son had a little birthday party to go to not too long ago. I always think it's fun to send a handmade gift if I have time. But I am always pressed for time and I can only seem to manage "lickety split" projects that can be made the day of...sometimes the hour before..it's true!. This little project fits the bill perfectly. What little girl doesn't love a new little skirt to run around in?

I just sort of made it up and it's not put together the correct way, it's put together the fast way. :) I'm sure there are a ton of tutorials out there.
Here's a mini description of how I made it...


I just sort of made it up and it's not put together the correct way, it's put together the fast way. :) I'm sure there are a ton of tutorials out there.
Here's a mini description of how I made it...
- Use the width of the fabric off the bolt (about 44") and cut it to the desired finished skirt length (minus 1 inch).
- Cut a 5'' strip of another fabric, folded it in half and sewed it to the bottom of the skirt. Finish the edges with a zig-zag or serger.
- Press the folded band down and topstitch along the seam. No hemming on this skirt!!

- Sew the short ends together. Finish that seam too! Press it to one side and use your sewing machine to tack (sew back and forth for about 3 stitches) the seam down at the bottom of the hem so it stays folded over.
- Make a casing in the top a little bigger than the width of your elastic. How? Press the top edge over 1/4 inch and then fold it over again and press. I made my casing 1 inch wide and used a 1/2 inch elastic to thread through it. Stitch the casing leaving an opening in the back to thread the elastic through.
- Stitch around the top too, so it looks cute when she tucks in a shirt.
- Thread your elastic through. Stitch it together. Sew the opening closed with a little tag or ribbon so she'll know which side is the back

Quick and cute!
Subscribe to:
Posts (Atom)